Active Directory which is the management service in Windows Server is installed on a server that is called Domain Controller (DC). When active directory have been installed on a server. You can promote the server to a domain controller. Every network needs at lest two domain controllers. When one of them is down, the other domain controller take the place and respond to clients. The Domain controllers respond to security authentications like logging in, checking permissions, files access, system check up and many more.
When you want to log in to a server from a client computer, you should have a user name and a password. Your system will be checked to have updated anti-virus and etc.
Permissions are the level of the tasks that you can do in the domain. File access is about the level of your access to sources. These and a lot more duties are done through domain controller.
In this article, I am going to show some easy steps outlined to promote server to domain controller. First, make sure that you logged in as an administrator.
Prerequisites
Install Active Directory Domain Services (AD DS) role on the server you want to promote it to domain controller (DC).
Promote Server to Domain Controller
Follow the following steps to promote server to domain controller.
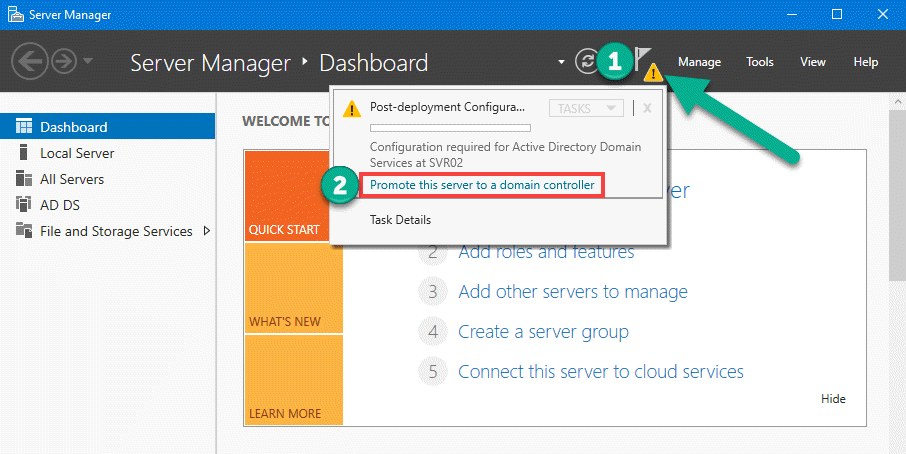
1. After the role installation, open Server Manager. Click on the flag, then click on Promote this server to a domain controller hyperlink.

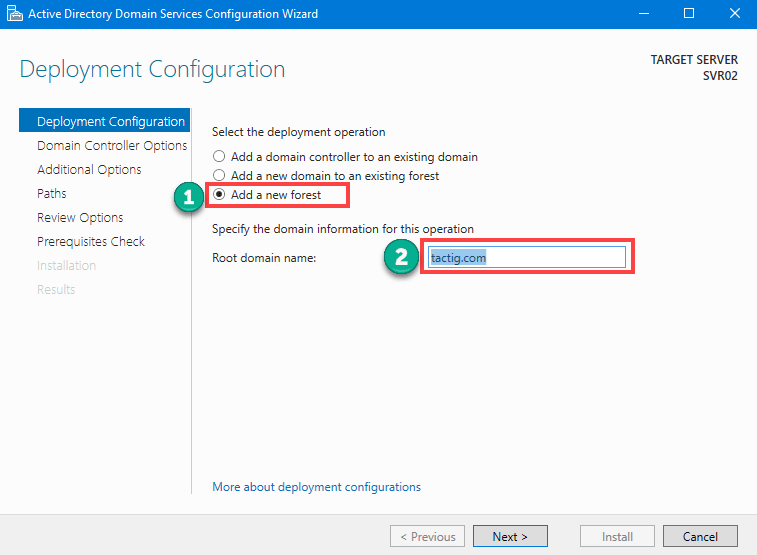
2. When the Deployment Configuration page appears, you see three options.
- Add domain controller to existing domain: This option is used when you want to add additional domain controller.
- Add a new domain to an existing forest: This option is used for adding a new domain to existing forest.
- Add a new forest: It is used for creating a new forest.
Select the third option: Add a new forest. Enter a Root domain name and click on Next button.

3. Specify the forest and domain functional levels (2008, 2008R2, 2012, 2o12R2, 2016). Type a complex password (composed of capital letters, small letters, numbers, symbols).
By default, Domain Name Services (DNS) server is installed at the same time when you are promoting the server to domain controller. If you want to install DNS server later, remove the selection from the box next to Domain Name Services (DNS) server. Click on Next button when you’re finished here.

4. On the Additional options page, let the NetBIOS domain name as selected by default. If you want, you can change the NetBIOS name. Click on Next button to move on next page.

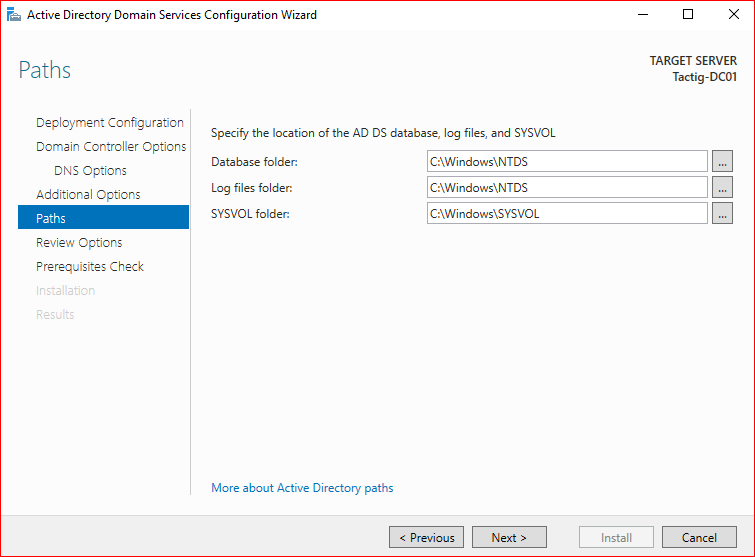
5. Thus you can specify the path that you want to restore your Database files, log files and SYSVOL files. The path page give you the options to specify location of the sources to be restored. When you finished your work, click on Next button.

6. The next page is Review options. You go nothing to do. Click on Next button. The Prerequisites Check page shows you the summary of all prerequisites that are verified or not. If it’s verified click Next. If not, recheck the steps you did just before and be sure you have done all correctly. Click on Install button. After the installation succeeded, the system automatically reboots.

Conclusion
After the restart, the server is domain controller. It is really easy to promote server to domain controller (DC). Also, you can start managing and controlling users from your server. For any questions leave a comment below. I would be glad to answer your questions as soon as possible.
