Secure File Transfer Protocol (SFTP) is a network protocol that provides file access, file transfer, and file management over a TCP/IP network or any reliable data stream. SFTP uses SSH to transfer files, and data is encrypted to prevent sensitive information from being exposed to the network in plain text. SFTP allows web hosting and cloud service providers’ customers to transfer files over the network. For a long time, Microsoft Azure—one of the leading cloud providers, did not offer a fully managed service that allows users to transfer files via the SFTP protocol.
A common approach in the past was to leverage an Azure Container Instance (ACI) powered by Azure File Shares, or to set up a virtual machine-based SFTP server on the Azure Blob Storage (Microsoft’s object storage solution for the cloud), and then configure the SSH and SFTP services from the ground up. But these are usually cumbersome and come with a substantial amount of administrative effort. To overcome these challenges, Microsoft recently announced the release of SFTP support for Azure Blob Storage. It is a fully managed, highly scalable SFTP service that lets you securely connect to Blob Storage and execute simple, secure, and easy-to-manage file transfers. In this article, we show you how to deploy SFTP service on Microsoft Azure using this new approach, as well as a commercial approach using a third-party SFTP provider.
Deploy SFTP on Azure Using Microsoft Managed SFTP Service
To deploy SFTP on an Azure storage account, you need to enable SFTP, and then connect to Blob Storage by using an SFTP client. To do this, the following prerequisites must be met:
- An Azure subscription and you must also register the SFTP feature with your Azure subscription.
- An Azure storage account—a standard general-purpose v2 or premium block blob storage account. You can also enable SFTP as you create the account.
- Azure CLI, you can either install the Azure CLI locally or use the Azure Cloud Shell.
- The hierarchical namespace feature of the Azure storage account must be enabled. To enable the hierarchical namespace feature, check out Upgrade Azure Blob Storage with Azure Data Lake Storage Gen2 capabilities.
- If you’re connecting from an on-premises network, make sure that your client allows outgoing communication through port 22 used by SFTP.
Once you’ve met all the prerequisites, follow the steps below to deploy SFTP on Azure:
- Enable SFTP Support: If you have an existing storage account, you can enable SFTP support in the following ways:
- Log in to your Azure portal and navigate to your Storage account.
- Under Settings, select SFTP.
- Click on Enable SFTP as shown on the screenshot below.
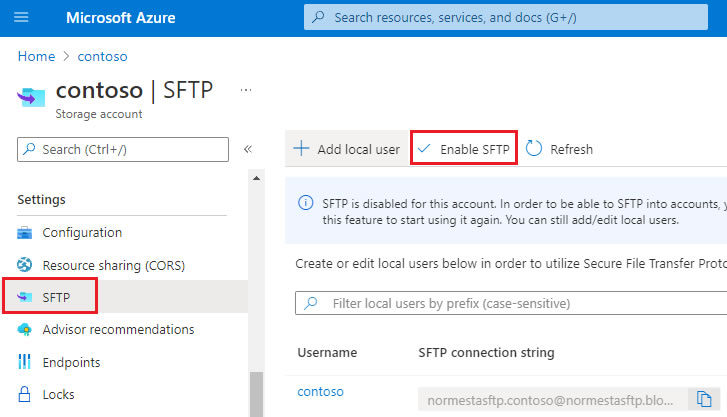
Note that this option appears only if the hierarchical namespace feature of the account has been enabled. Otherwise, check out Upgrade Azure Blob Storage with Azure Data Lake Storage Gen2 capabilities to enable the hierarchical namespace feature. If you are comfortable with PowerShell and command line tools, you can also enable SFTP support using the PowerShell method and the Azure CLI method.
- Configure SFTP Permissions: SFTP permission model is based on a new form of identity management called local users. To grant access to a connecting client, the storage account must make use of a local user identity, which must use either a password or a Secure Shell (SSH) private key credential for authentication.
You can use the Azure portal to configure local users for an existing storage account, choose an authentication method, and assign permissions for that local user by following the steps below as stipulated by Microsoft:
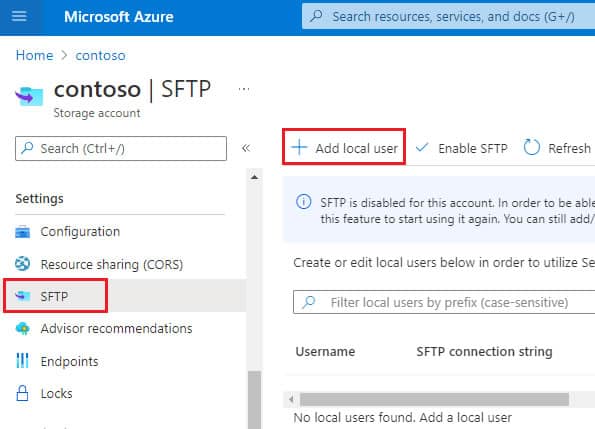
- In the Azure portal, navigate to your Storage account.
- Under Settings, select SFTP and then select Add local user as shown on the screenshot below.
- In the Add local user configuration pane, add the name of a user and then select which methods of authentication you’d like to associate with this local user. You can associate an SFTP connection string password and or an SSH key.
- Click Next to open the Container permissions tab of the configuration pane.
- In the Container permissions tab, select the containers you want to make available to this local user. Then, select which types of operations you want to enable this local user to perform, as shown on the screenshot below.
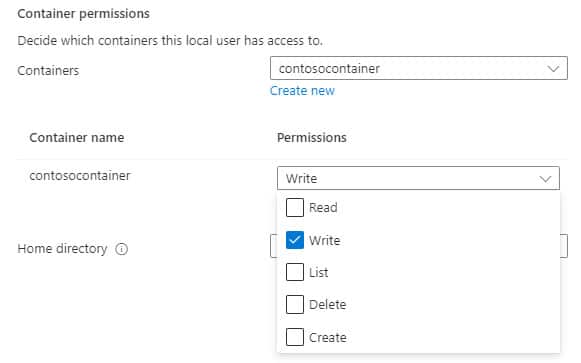
- In the Home directory edit box, type the name of the container or the directory path (including the container name) that will be the default location associated with this local user.
- Click on the Add button to add the local user.
If you enabled password authentication, then the Azure-generated password appears in a dialog box after the local user has been added. Note that you can also configure SFTP permissions by using PowerShell or Azure CLI methods.
- Connect an SFTP Client: Once you deploy the SFTP service, you can use any SFTP client such as Putty, WinSCP, or OpenSSH to securely connect and then transfer files. The following screenshot shows a Windows PowerShell session that uses OpenSSH and password authentication to establish connections and make transfers.

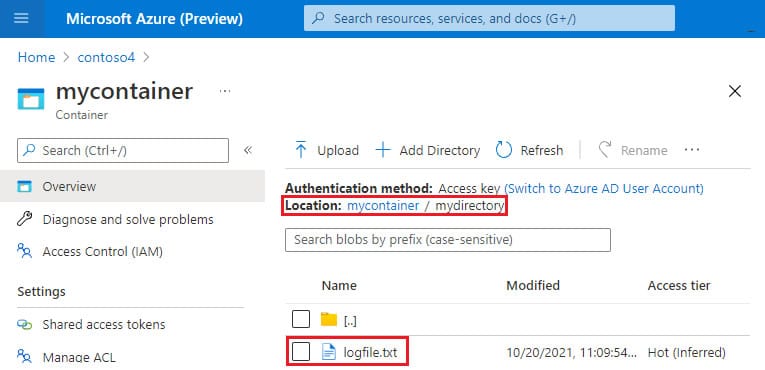
After the transfer is complete, you can view and manage the file in the Azure portal as shown on the screenshot below.
You can also connect using a custom domain or a private endpoint. When using custom domains the connection string is myaccount.myuser@customdomain.com. But if the home directory hasn’t been specified for the user, the connection string is myaccount.mycontainer.myuser@customdomain.com.
If you want to configure the storage account to be accessible over a private endpoint so that you can transfer files to SFTP over a private IP instead of a public IP address, the connection string is myaccount.myuser@myaccount.privatelink.blob.core.windows.net.
This is especially useful in situations where you need an SFTP service within your Azure environment or between your on-premises network and Azure network using site-to-site VPN. If the home directory hasn’t been specified for the user, the connection string becomes myaccount.mycontainer.myuser@myaccount.privatelink.blob.core.windows.net.